Step-by-step guides for buyer agents, sellers, and ShopProp clients. Every guide takes about a minute to read.
You're a ShopProp client
These guides emphasize what your ShopProp team handles for you automatically (showings, disclosures, negotiations, contract). You'll mostly be confirming, reviewing, and watching activity. The "FSBO" sections are kept for reference but don't apply to your listing.
Pick your role
Guides are organized by what you're trying to do. If you're not sure, start with the one that matches how you ended up here.
Reach the listing team directly from your portal — they answer faster than us. ShopProp clients can also reply to any notification email and our team will pick it up.
Show & Disclose accepts offers directly on the listing portal. Your offer terms go straight to the seller's side, with notifications by email and text instantly. Same flow whether the listing is ShopProp-managed or FSBO.
Steps
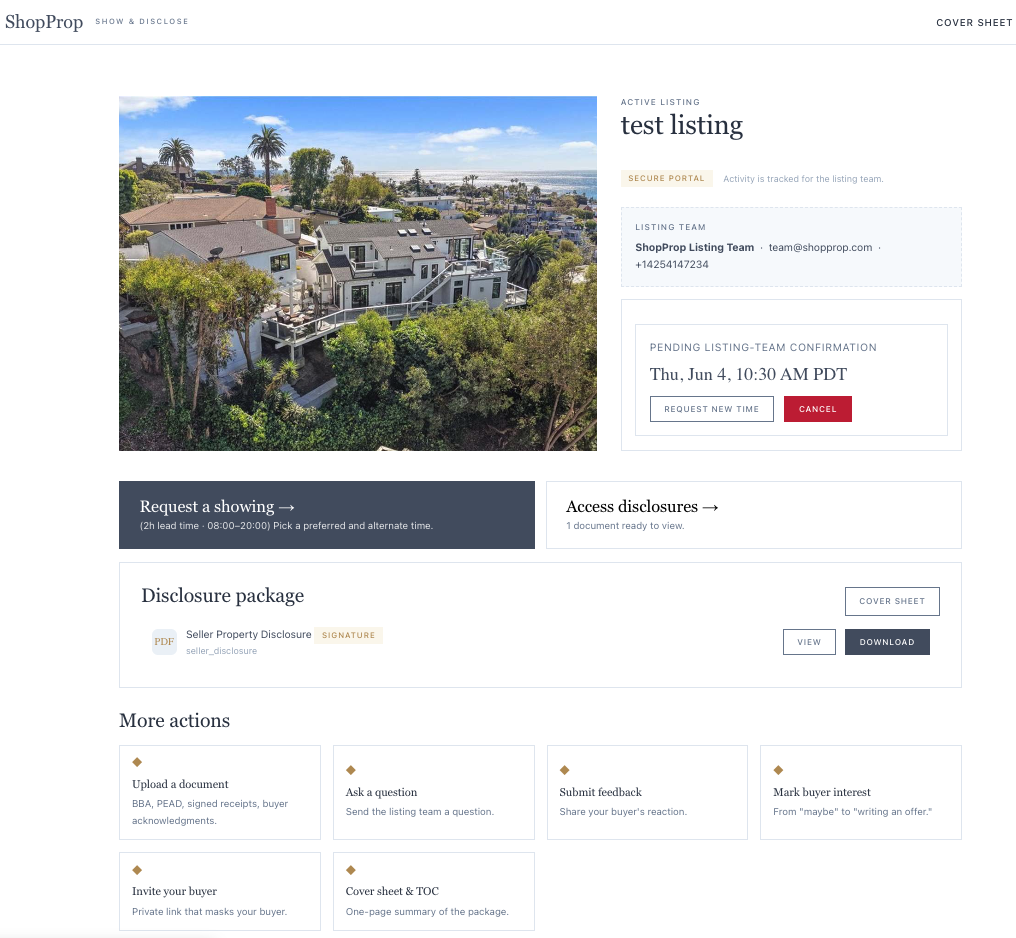
From the listing portal (the /p/… link the listing team shared), find the "Submit an offer" tile under "More actions."
Fill in your contact info, your buyer's name (optional), and the key terms: price, earnest money, closing date, financing, contingencies, expiration. Don't worry about formatting — "$1,250,000" and "1.25M" both work.
Upload the signed offer PDF. The seller side sees this exactly as you uploaded it.
If this is a dual-agency deal (you're a ShopProp agent representing your own buyer), expand the "Are you a ShopProp agent?" section and paste your buyer's transaction URL or ID. Optional, but it helps ops open the matching Buyer Negotiating Offer ticket faster.
Hit Submit offer. You'll get a confirmation immediately, and an email confirming receipt within a minute.
The portal view a buyer agent sees. "Submit an offer" lives under More actions.
What happens after you submit
The listing team gets notified by email and text instantly. The seller sees the offer in their dashboard. You'll receive a status email every time the offer changes state: under review → countered → accepted / rejected. Each email has a recap of your terms so you know exactly which submission is being discussed.
The "Share with your buyer" link
If you flagged dual-agency at submission, the confirmation modal includes a dashboard URL for your buyer. They can track the deal alongside you on dashboard.shopprop.com. Forward it once and they're set.
If your offer gets countered
You'll receive an email with the counter terms in the message body. Reply by submitting a revised offer through the same portal. The seller side sees both your original and your revision side-by-side.
Common questions
Do I need an account on Show & Disclose to submit an offer?
No. The portal link is the only auth needed. Your email confirms identity for status updates.
What file format does the PDF need to be?
Standard PDF. Signed by your buyer. The system passes it through — no re-rendering, no formatting changes.
Will the seller see my buyer's name?
If you filled in the buyer name field, yes. The seller's side sees it as part of the offer details. Skip the field if you'd prefer it stay private until contract.
Can I withdraw my offer after submission?
Reply to your status email or call the listing team — they can mark it withdrawn in seconds. We don't currently expose a self-serve withdraw button to buyer agents to prevent accidental clicks.
What if the listing is FSBO (no ShopProp agent involved)?
Same flow. The seller themselves accepts, rejects, or counters directly from their dashboard. You'll still get the same status emails.
Showings are scheduled directly from the listing portal. The seller side gets notified instantly, and most listings have auto-confirm enabled — meaning your time slot becomes confirmed without anyone having to act.
Steps
From the portal, hit "Schedule a showing" — it's the primary action at the top.
Pick your preferred date and time. The availability picker shows when the listing accepts showings (e.g., not during blackout windows).
Fill in your name, brokerage, email, and (optionally) phone. If you check "Text me showing updates" we'll send status SMS alongside email.
Submit. You'll get an instant confirmation with the time slot and the listing's address.
The listing team sees every showing in one place and can confirm, deny, or counter-propose with one click.
What happens after you request
If auto-confirm is on (most listings): your slot becomes confirmed immediately. You'll get an access-instructions email near the showing time.
If the seller side reviews manually: they accept, deny, or counter-propose. You'll get an email + (if opted in) text with the result.
If a counter-propose comes in: the email has Accept / Decline buttons. One click and you're confirmed for the new time.
Access on the day
About 30 minutes before your slot, you'll receive an email with the access instructions: lockbox code, electronic lockbox app pairing, gate codes, etc. Time-gated so the info isn't exposed before the appointment.
Need to cancel or reschedule?
The confirmation email has a cancel link. Or use the same portal link and look for your showing under "Your showings on this listing." The seller side is notified instantly.
Common questions
Why didn't I get the access instructions yet?
They unlock ~30 minutes before the showing for security. Check the email again at that time, or refresh your confirmation link.
Can I request a same-day showing?
Depends on the listing's rules. Most allow it. If the time isn't available in the picker, the seller has blackouts or minimum-notice rules in effect.
What if I need to bring multiple buyers?
That's fine — you book one showing per buyer agent visit. If multiple agents need the property the same day, each books their own slot.
How will I know if the showing was rescheduled?
Email + SMS (if opted in). The seller side can't reschedule without your acceptance — counter-proposals always require you to confirm.
Listings publish their disclosure package directly on the portal. Some documents require a typed-name acknowledgment before download — the seller's side sees who reviewed what and when, which becomes part of the audit trail if questions come up later.
Steps
On the portal, tap "Disclosures" in the actions grid.
Scan the document list. Each item shows the title and whether ack is required.
Tap a document to preview / download. If ack is required, type your name in the box to confirm review.
Documents you've downloaded show a checkmark so you don't waste time re-reviewing them on return visits.
If a disclosure is updated after you've downloaded it, you'll get an automatic email letting you know a new version is up. That's why we ask for your email at download time.
Why the typed-name ack?
For sensitive documents (SPQ, agent visual inspection, lead-based paint), the seller's side needs proof of who reviewed what. The typed-name approach is the lightest-weight way to do that without requiring a full e-signature flow.
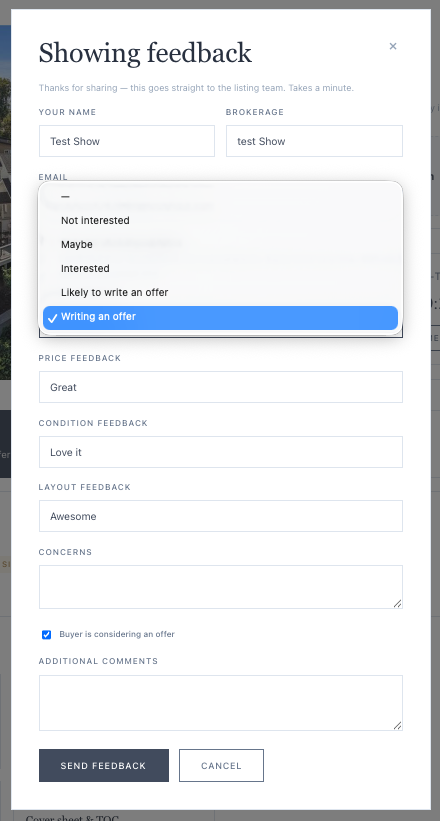
About an hour after each completed showing, you'll get an email asking for your buyer's reaction. One link, one form, takes under 60 seconds. Sellers use this to gauge real interest and adjust pricing or staging.
What we ask
Buyer interest level: still looking → writing an offer.
Price feedback: underpriced → fairly priced → way over.
Condition feedback: turn-key → major reno needed.
Layout feedback: excellent flow → poor layout.
Concerns or red flags: free text, optional.
Everything is optional except interest level. Sellers see aggregated feedback across all showings, not individual responses, so anonymity is preserved unless your buyer is writing an offer.
One ask per showing
We don't pester. One email request per completed showing, ever. After you respond (or 7 days pass), we drop it.
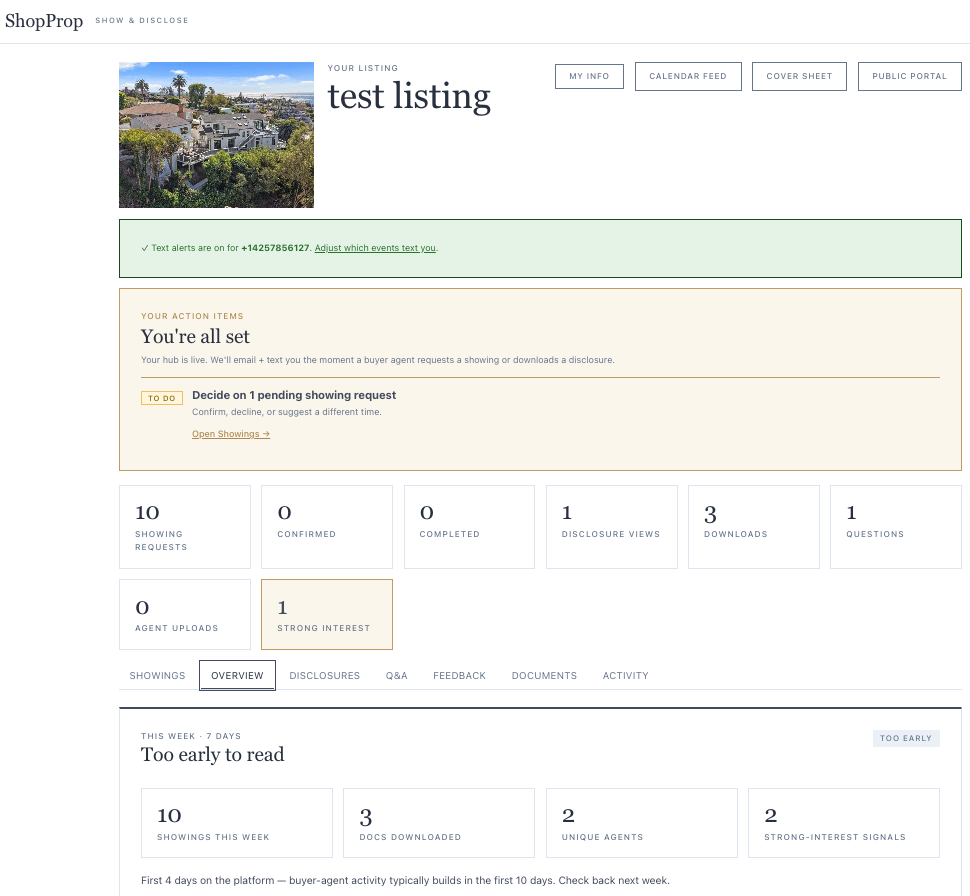
Your dashboard is the one-stop view of every activity on your listing: showings, disclosure downloads, buyer-agent questions, offers, and the daily weekly pulse. You reached it from the seller link in your invite email.
What you'll see
The seller dashboard. Activity stats at the top, alerts panel, weekly pulse, and per-section cards below.
The top stats row
Quick-read counts of everything that's happened on your listing: showings requested, confirmed, completed; disclosure views and downloads; questions asked; documents uploaded; strong-interest signals.
Weekly Pulse
Comparative read of this week vs. last week. The headline verdict (Very Strong / Healthy / Moderate / Cool) is calibrated against private-showing volume and disclosure downloads — the strongest signals of real buyer interest. Open-house traffic is intentionally not the headline metric because it attracts neighbors and lookers along with real buyers.
Showings, Disclosures, Open Houses, Recommended Next Steps
Each section is a panel you can expand. Showings shows everyone who's requested or visited. Disclosures shows what's published. Open Houses shows scheduled events. Next Steps is a personalized checklist of high-leverage actions.
Notifications
You control what arrives in your inbox and on your phone. Under My info (the link at the top), set:
Email opt-in per event type (showings, offers, disclosures, questions, etc.)
Phone number for SMS, with a quick verify code
Additional recipients — your spouse, co-owner, or anyone else who should hear about activity
For ShopProp clients
You'll also see a "View on your ShopProp dashboard" button on offers — it jumps you straight to the deeper conversation thread, checklist, and documents view on dashboard.shopprop.com.
Every activity on your listing triggers a notification — but you control which ones reach you and how. Defaults are reasonable; tune as needed.
Per-event opt-ins. Each switch controls email and SMS independently.
The events you can opt into
New showing requested
Showing confirmed / cancelled / rescheduled
New offer received
Offer status changed
Disclosure downloaded
Buyer-agent question
Feedback submitted
Daily digest (one summary email per day at 5pm)
Multi-recipient setup
Got a spouse, co-owner, listing partner, or property manager who needs to be in the loop? Add them as a notification recipient. Each recipient has their own email + phone + per-event opt-in matrix. SMS requires a one-time verification code to prevent spam.
STOP keyword
Reply STOP to any text message and you're immediately removed from SMS. We won't text you again until you re-opt-in. Email opt-outs work through the unsubscribe link in any notification email.
When a buyer's agent requests a showing, the request lands in your inbox and on your dashboard. You decide what to do.
Three options on every request
Confirm: approve the slot as requested. The agent gets a confirmation email immediately. Access instructions go out ~30 minutes before the showing.
Counter-propose: suggest a different time. The agent has to accept your counter — they can't change it again unilaterally.
Decline: reject the slot. We send the agent a polite message and you can leave an optional note.
Auto-confirm
Enable auto-confirm under Settings and any showing request that falls within your allowed days and hours becomes confirmed automatically. You still get an alert, but no action required from you. Most ShopProp clients run this on once their listing is live.
Blackout windows
Block off times you don't want showings — out of town, scheduled cleaning, holidays. The buyer agent's availability picker never offers those times, so you never have to deny them after the fact.
Open houses are scheduled from the Open Houses panel on your dashboard. Once scheduled, the event appears on the public portal so visiting buyer agents can prepare.
ShopProp-managed listings
If your listing is managed by ShopProp, the "+ Schedule open house" button on your dashboard takes you directly to your ShopProp dashboard's property view. From there your agent helps coordinate marketing, signage, and lead capture. We do this because the dashboard has more tooling for open-house follow-up than Show & Disclose itself.
FSBO listings
If you're self-managing, the button opens an inline form: date and time, duration, optional host name, optional notes. Submit and it's live. After the open house, return to the panel to log results: attendee count, hot leads, agent counts.
A note on signals
Private showings and disclosure downloads are stronger barometers of real buyer interest than open-house turnout. Open houses attract neighbors and looky-loos along with real buyers. Strong showing volume + low open-house turnout is a good sign, not a bad one.
When a buyer agent submits an offer through your portal, you'll get an email + text instantly. Your dashboard's Offers panel shows the full terms. You can accept, counter, reject, or mark as under-review directly — no need to leave the dashboard.
Steps
Open the offer card on your dashboard. You'll see the price, earnest money, closing date, financing type, contingencies, and the buyer agent's contact info.
Open the PDF (the original signed offer) using the document link.
Decide:
Accept — locks the offer in. The buyer agent gets an immediate email, the offer is finalized, and the next step is contract logistics (handled outside the platform).
Counter — opens a message box. Type your counter terms ("$1.29M, close 8/15, EMD $50k upon mutual…"). The buyer agent gets your counter in their email.
Reject — declines the offer. You can leave a brief message ("we've accepted another offer," etc.).
Mark reviewing — buys you time. The buyer agent sees that you're actively looking at it, no decision yet.
Multi-offer situations
If you have multiple offers, each one is independent. You can mark some "under review" while keeping others active. Best practice: reject obviously low offers immediately so those agents don't tie up your phone with follow-ups.
When you accept one, the others stay open (in case the accepted offer falls through) until you explicitly reject or withdraw them.
Accepted offers are locked
Once you mark an offer as Accepted, you can't change its status from your dashboard. To re-open negotiations, contact the buyer agent and ask them to mark it withdrawn, then resubmit.
If ShopProp is helping
If your listing is ShopProp-managed, the offer flow is read-only on your end — your ShopProp agent handles negotiations and updates the status. Your dashboard reflects everything in real time. There's also a "View on your ShopProp dashboard" button that jumps you to the deeper conversation thread on dashboard.shopprop.com if you want to see what's being said.
Common questions
Can the buyer agent see my counter terms or just see "countered"?
They see your message in full in the email. Plain text, exactly as you typed it.
What if I want to negotiate by phone instead?
Totally fine. The status buttons (Accept / Counter / Reject) are for the record — you can negotiate by any means. Just update the status when you have a final answer so the audit trail is accurate.
How long does the buyer agent have to respond to my counter?
The portal doesn't enforce a deadline. If you want one, include it in your counter message ("Best & final by Friday 5pm PT"). Most agents respect that.
Can I see who else got the offer notification?
The Recipients section under My Info shows everyone who got pinged. Useful when your spouse or co-owner is in the loop.
Counter-offering through Show & Disclose is mostly about clear communication. The platform sends your counter message to the buyer agent verbatim, then waits for them to respond either through email or a revised offer.
Writing a good counter
Three things every counter should include:
Your counter price — exact number, not a range.
Terms you're changing — close date, EMD amount, contingency removals, etc.
A deadline — "Best & final by Friday 5pm PT." Without one, negotiations drag.
Example: "Counter at $1,290,000, close 8/15. Earnest deposit $50k upon mutual. Inspection contingency removed at acceptance. Please respond by Friday 5pm PT."
If they counter back
They'll submit a revised offer through the same portal. You'll see both versions side-by-side. The status returns to "received" so you can decide again.
Access instructions — lockbox codes, gate codes, electronic lockbox pairings — are managed under Settings. They're delivered to buyer agents automatically about 30 minutes before each confirmed showing.
Setting it up
Settings → Access Instructions. Enter what the buyer agent needs to know: lockbox combo, alarm code, where the key is, parking notes, the dog's name and whether they bite.
Save. We deliver this to confirmed buyer agents only, ~30 min before their slot.
The delivery is time-gated for security — agents don't get codes hours in advance, only when they're realistically about to use them.
Changing the code mid-day
If you change the lockbox combo after a showing has been confirmed, update Settings immediately and consider texting the agent directly too. The system will email the new instructions, but if their slot is in the next 30 minutes they may have already received the old code.
When you list with ShopProp, your listing team handles the moving parts — disclosures, showings coordination, offer negotiation, contract logistics. Show & Disclose is your real-time window into all of it. Here's a clear breakdown of who does what.
Your ShopProp team handles
Disclosures — drafting, uploading, replacing on updates. You review and confirm; they manage the package itself.
Showing coordination — buyer agents request through the portal, your team reviews and confirms. Auto-confirm is on by default once your listing is live.
Offer review & negotiation — when an offer comes in, your team is notified immediately by email and text. They reach out to discuss terms with you, then negotiate with the buyer's side.
Open house planning — your team coordinates the date, marketing, signage, and follow-up.
Contract & closing — happens on the agent dashboard, not Show & Disclose. The "↗ View on your ShopProp dashboard" button takes you to the deeper transaction view.
You handle
Confirming your contact info when you first land on the dashboard — phone for SMS alerts, additional recipients (spouse, co-owner).
Reviewing activity — you'll see every showing, disclosure download, question, and offer in real time.
Approving counter offers — your team negotiates, but big decisions (accept, counter, reject) are yours.
Replying to buyer-agent questions when they're about something only you know (history of the home, neighborhood context).
Read-only on offers means you see everything
On ShopProp-managed listings, the Accept/Counter/Reject buttons aren't shown on your dashboard — your team handles the actual status changes. But you see every offer's full terms, PDF, status history, and your team's notes. Plus the "↗ View on your ShopProp dashboard" button jumps you straight to the conversation thread with the buyer agent.
How to reach your team
Reply to any notification email — it goes straight to your team's shared inbox. Most replies get answered within hours, faster on weekdays.
Use the seller dashboard's notes feature — for context you want logged permanently against the listing.
Call your ShopProp contact directly — the team phone is on your invite email.
When a buyer agent submits an offer through your listing's portal, your dashboard updates immediately. Your ShopProp team is notified by email and SMS at the same time. From there, the negotiation runs through your team — but you're never out of the loop.
What you see immediately
The offer card on your dashboard's Offers panel
An email notification with the full offer recap and a link back to your dashboard
A text message with the price and buyer agent name (if you have SMS alerts on)
What happens next
Your team reviews the offer against your goals and the comp landscape.
Your team reaches out — typically within a few hours — to discuss with you.
You decide — accept as-is, counter with specific terms, or reject.
Your team executes — they update the status on the platform and email the buyer agent the result.
Where to track the conversation
Two surfaces, same data:
Show & Disclose (where you are now) — quick summary, status, terms, PDF download.
Your ShopProp dashboard at dashboard.shopprop.com — full conversation thread between your team and the buyer's side, checklist, contract drafts. Click the "↗ View on your ShopProp dashboard" button on any offer card to jump there.
Why two surfaces?
Show & Disclose is the listing's public-facing portal — buyer agents, your seller dashboard, the offer intake. Your ShopProp dashboard is the private transaction workspace — contracts, contingencies, closing coordination. The offer record itself is shared between them, so you're always seeing the same source of truth.
Multi-offer situations
When multiple buyer agents submit offers on the same listing, you'll see them stacked on the Offers panel. Your team handles ranking + recommendation, but you make the final call. A common play: your team sends a "best & final by Friday 5pm" broadcast to all active buyer agents through the platform, then presents you with the revised offers as a comparison.
Common questions
Why can't I accept an offer myself from this dashboard?
For ShopProp-managed listings, your team handles status changes because they're connected to the contract workflow. You decide; your team executes. This way the offer status, the contract draft, and the closing checklist all stay in sync.
Can I see what my team wrote in the buyer-agent conversation?
Yes — click "↗ View on your ShopProp dashboard" on the offer card. Every message is visible.
If I want to negotiate by phone instead of email, can I?
Yes, just call your team. They'll update the platform statuses with the agreed outcomes so the audit trail stays accurate.
What if I want to reject an offer immediately without involving my team?
Call your team — they'll handle it within minutes. The platform prevents you from changing status directly to keep the contract workflow safe, but a phone call is always faster than the UI anyway.
If you're listing on the MLS, you'll want the Show & Disclose portal link in your Showing Instructions field so buyer agents can find it. Most MLSes reject slashes (/), so we generate a special MLS-safe access code for you.
Steps
From your dashboard, find the MLS-safe access code (under Settings or the listing detail).
Copy it — it'll look like SP7T35NQ: a short, no-slashes code that's easy to type.
Paste into your MLS Showing Instructions field, e.g.: "Disclosures & showing requests: showanddisclose.com/code SP7T35NQ"
When a buyer agent visits that URL, they're redirected to your full portal.
The code is unique per listing and never changes for the life of the listing. Don't worry about it being guessable — it's 8 characters with no ambiguous letters (no 0/O, 1/I/L), and the URL only redirects to the portal anyway — the portal still requires the full token for any action.